This is part 1 of my series on Organization for the Hopelessly Unorganized. Today I'll focus on how to actually get started with organizing your space, time, and creative life.
The major trick in getting organized is to actually want to be organized. That might seem obvious, but if you are a person that is usually hopelessly unorganized it will take quite a bit of motivation to make you start moving and actually do something about it. If you are accustomed to the chaos it is likely that you won't even realize how unorganized you've let yourself become. Wait until one of those moments when you are completely frustrated with something. My moments of complete frustration are usually when I've wasted a lot of time looking for something and I think "if this was better organized I wouldn't have to waste all of this time." It is in those moments that you are most likely to be motivated and stay motivated while you complete an organization task. If you dread the process you won't do a good job. If you don't do a good job then you've wasted your time. Wait until the moment comes and then take advantage of it!
While waiting on your next moment of complete frustration you need to get some things together so that you can jump right in when the mood strikes you. I've found that if I don't do this I will fall into what I call the "preparation trap." I get motivated to organize, I think about what I need to accomplish the task, I start digging around looking for what I need, I finally pull it all together ... and then I stall out because the moment has passed. I'm left with a big pile of stuff that I just pulled out and the end result is actually being less organized. Don't fall into the preparation trap - get it together now. The supplies you need to get organized will depend a lot on what it is that you need to organize.
Depending on what you make/do you'll need different types of containers, shelves, drawers, etc. I sew, so the main things I have to worry about are fabric, thread, buttons, and the biggest collection of notions you've probably ever seen outside of a craft store. When I was setting up my current studio space I spent a lot of time looking around and seeing what was available commercially to organize my things. I discovered that if there is something that you can collect there is probably a commercially available storage solution for it. However, they aren't always cheap or easy to find. Take the time to look around (in real life and on the internet) and see what your options are. If you are on a tight budget you can wait for sales or use coupons. I find that it is actually a lot of fun to come up with my own version of the storage solutions I find. The savings are great and it makes the whole organization process a little more creative - which suits me perfectly. When you find things that will make organizing your stash easier go ahead and buy them and put them somewhere central (organize your organizational tools!). When you are ready to do some organizing you can jump in head first.
Another thing that I find essential to organizing is a labeling tool. I like my fancy electric Dymo, which I picked up on sale somewhere. There are cheaper versions if you don't want to make the investment, but the electric version actually saves you a lot of time. To me, the time I save is worth every penny extra I paid for the fancy Dymo. You'll be amazed at how a label maker can change your life. Once you have one you'll probably find it difficult to stop labeling everything in sight!
I also like to collect random pieces of furniture and/or shelving that can be used for storage solutions. I pick them up from my friends or yard sales or on clearance somewhere (or from some other part of my house if I'm reorganizing elsewhere) and then I save them until I need them. Tell people you know to watch out for things - you'll be amazed at the stuff you can get your hands on if you just ask. Craigslist and Freecycle are also your friends when you are in search of storage solution furniture. Of course, if you are rich and don't care about saving money then you can just buy fancy new furniture and not worry about the whole collection process, but what fun would that be?
Get your stuff together and then wait for that burst of motivation to happen. When to moment strikes you'll be glad that you did!
Wednesday, September 24, 2008
Organization for the Hopelessly Unorganized - The Series
Over the next few weeks I'm going to do a series on getting organized. I'll be focusing on creative and inexpensive ways to organize studio spaces as well as ways to prepare yourself for the holiday buying season. The amusing thing about this series is that I am, admittedly, not the most organized person on Earth! I have, however, come up with a lot of ways to get myself more organized (and stay that way, which is always the biggest challenge in my world). I'm hoping that having first-hand knowledge of what it is like to spend half of a Saturday looking for something that you just know you "saw last week, right here" will help me give good, useful advice that can actually make the once hopelessly unorganized at least a little less stressed out.
The Organization Series will consist of the following:
1) What to do first when you want to get organized
2) Too much stuff, not enough space
3) I know it was right here, but now I can't find it
4) Giving yourself permission to be messy
5) The packing and shipping department
6) Working ahead = sanity
Thursday, September 11, 2008
Total Shop Overhaul
About a week ago I found myself looking at the transaction pages for the first sales that I made after joining Etsy. I don't remember why I thought to go look at them, but there I was, staring at the first thing I ever listed (which was, not surprisingly, an early rendition of a Coffee Corset). Then I looked at some of my other first listings ... amazed that the things sold with such awful photos attached to them. I laughed at my photography skills and thought "Gosh, that was SO long ago!". Then, suddenly, I had this terrible sinking feeling as I realized that the pictures that graced 216 currently listed items weren't much better than my original attempts. "I really should do something about my pictures", I thought.
I immediately went into shop overhaul overdrive. I built a new and improved light box system. I picked out a couple of choices for new fabric backgrounds (that burlap look just wasn't doing it for me anymore!), took some shots, and asked for advice in the Etsy forums. The forum voters picked the dark chocolate brown satin, so I went with that. I started pulling out ALL 216 corsets and reshooting photos of each of them. Every 20 corsets I stopped and edited the listings so that the new photos were in place. It took many, many hours of work, but I was really happy with what I was seeing.
All photos rehot and uploaded: At that point I *almost* stopped because I was feeling quite proud of myself. But I pushed ahead and made a new banner that matched the new photo style. Even better! Then I went through every bit of profile, appearance, etc. and made sure everything was up to date and clear. Done! There wasn't anything left to "fix" and I could sit back at last and appreciate the work I'd done.
I'm thrilled with the new look of the shop and the positive feedback I've gotten from others is great, too. Now I can get back to sewing!
Wednesday, September 3, 2008
Being featured
As a "maker of things" it is the coolest thing when someone not only notices that I exist, but wants to tell everyone else about me and the things I make. Sometimes people "ask permission" to blog about me - really, does anyone ever turn down free advertising? Sometimes I get a google alert and there I am popping up somewhere new. It is fascinating to me.
While I appreciate any and all shout-outs, I have to say that the feature by I See the Moon Photography is my favorite. How cool is that! I just love how she displayed them - and the oohing and aahhing over how wonderful they are is pretty sweet, too. Now, if I could just get my pictures of Coffee Corsets to look as fantastic ....
While I appreciate any and all shout-outs, I have to say that the feature by I See the Moon Photography is my favorite. How cool is that! I just love how she displayed them - and the oohing and aahhing over how wonderful they are is pretty sweet, too. Now, if I could just get my pictures of Coffee Corsets to look as fantastic ....
Monday, September 1, 2008
Treehouse Studio Tour
Let me make a long story short - I promised my husband that he could have the LCD television he wanted if I could take over the whole third floor so that I'd have more space. That was back in January and before he could finish saying, "Well, I guess that would work." I was already packing things up and hauling them upstairs. My treehouse studio was born, but continues to be a work in progress.
Let me first tell you about the space itself. Our three story home is topped off with a loft-like room which is technically a large bedroom. It has a bathroom, a large walk-in closet, and two large walk-in unfinished attic storage areas. Once you take away the things I've just mentioned you are left with a T-shaped space which is graced on one end by a flight of stairs and on the other end by a set of 3 large windows which overlook our wooded backyard. In total there is about 270 square feet of usable studio space. While it is still not my dream space, it is definitely a vast improvement from the 11 by 10 foot spare bedroom that I previously occupied.
Yesterday I was feeling a little better after a week of being under the weather and I took the opportunity to straighten things up a bit. As I stood back to admire my work I decided I better take some pictures so I could fool everyone into thinking that I was always so neat and tidy.
On to the pictures!
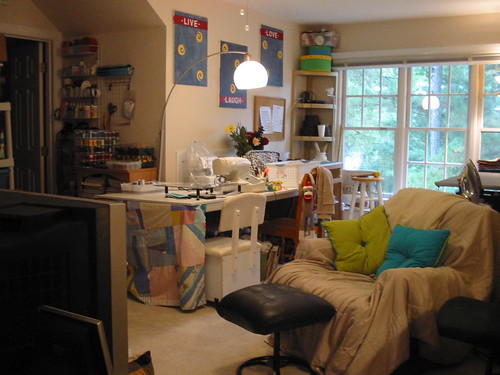 This first shot is what you see when you first get to the top of the stairs. The door that you see on the left leads to the bathroom. To the left of that door (just out of view) is a set of shelves which holds my bins of larger fabric cuts and boxes of office-related material. To the right of the door is a large wire shelf that I installed to organize my glues and sprays and larger notions. To the right of that is a small bookshelf (which I hope to upgrade soon) filled to capacity with craft-related books and magazines. it is topped with my pretty darn impressive thread stash. To the right of that you have the sewing area. My favorite machine is set up and ready to go at all times in front of the white chair, while the machines I use less often kind of hang out by the wall and can be pulled forward to the brown chair work station when they are needed. Under the table I have storage shelves which gives me a lot of room to put things that I don't use that often. The table was "created" by setting up a standard folding table and making it "bigger" by topping it with pieces of melamine (which have the added bonus of making the table less "bouncy" when my machines really start rocking). To the right of that is the cutting station - which is simply an uninstalled kitchen sink base cabinet that I topped with a large piece of melamine and a self-healing mat. I got the base for free because it didn't have doors (oh well) and had a minor scratch (which I could care less about). The height is absolutely perfect for me. In the picture you can also see my super comfy chair, which I spend a lot of time in. It is not pretty enough to leave uncovered, but it is seriously the most comfy chair in the whole world.
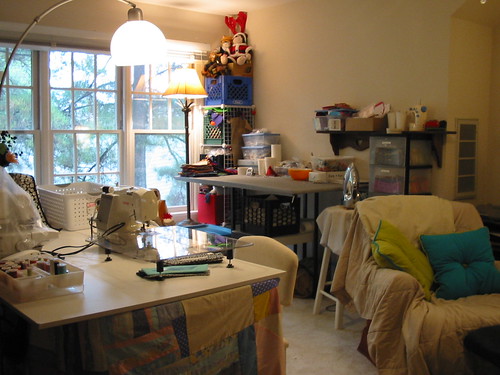 In this next shot you can see the padded surface of my work table. I can iron directly on the table, which is a huge time saver. It is just one of those "pop up tables" that you can get for under $50 if you keep your eyes open for sales at Jo-Ann's. I highly recommend them. Under that table and to the left and right you'll see a variety of storage shelves and bins. Oh, and see that light hanging above the sewing machine? I got it for $15 at Walmart and I have no idea how I lived without it! It is absolutely the way to go if you are in a room where you seem to always be casting a shadow with your head right where you really need the light to be. Speaking of lighting, overhead there is a ceiling fan (which is great) that has a light (which is less than great). Therefore, I was forced to resort to task lighting at each of my work stations. I'm pretty happy overall with the lighting, and during the day the lighting isn't an issue at all since the windows let in so much natural light.
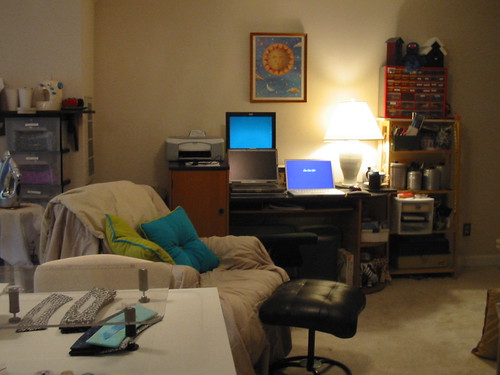 In this third picture you get to see what I call the technology station and the Tower of Terror (the precariously piled shelving solutions that were never meant to work together). Yes, you do see 2 laptops AND an extra monitor. I'm in the process of breaking in my new laptop and I still have to refer back to the old one (which has a burned out backlight and only works if you hook it up to a separate monitor) to find things I forgot to move over to the new computer. It is a painful process, and takes up WAY too much room on the desk.
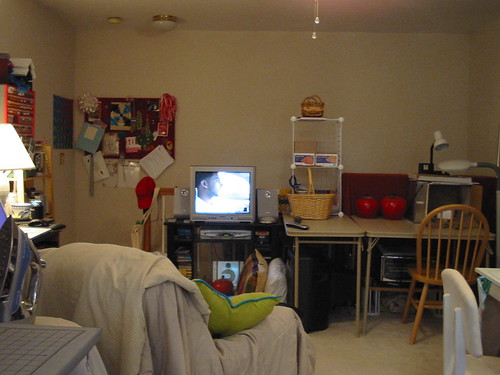 And finally we have a shot looking back where we started. The stairs exit down on the left. To the right of that you can see the very necessary TV/DVR/stereo area (when you spend as much time as I do in this room you need some noise to keep you company). And then to the right of that you see my packaging and photographing area (my super fab light box that I made for free over a year ago is still doing its job just fine!).
So that is a tour of my studio. It is a mish-mash of random things that I've managed to pile up, repurpose, and arrange into a space that functions - even though it will never make the cover of "Glamorous Studios" magazine. My husband says that if I had a refrigerator up here I'd probably never come downstairs, but that isn't true - the dog needs to go for a walk every now and then and so far I haven't figured out a way to do that from the third floor.
Let me first tell you about the space itself. Our three story home is topped off with a loft-like room which is technically a large bedroom. It has a bathroom, a large walk-in closet, and two large walk-in unfinished attic storage areas. Once you take away the things I've just mentioned you are left with a T-shaped space which is graced on one end by a flight of stairs and on the other end by a set of 3 large windows which overlook our wooded backyard. In total there is about 270 square feet of usable studio space. While it is still not my dream space, it is definitely a vast improvement from the 11 by 10 foot spare bedroom that I previously occupied.
Yesterday I was feeling a little better after a week of being under the weather and I took the opportunity to straighten things up a bit. As I stood back to admire my work I decided I better take some pictures so I could fool everyone into thinking that I was always so neat and tidy.
On to the pictures!
This first shot is what you see when you first get to the top of the stairs. The door that you see on the left leads to the bathroom. To the left of that door (just out of view) is a set of shelves which holds my bins of larger fabric cuts and boxes of office-related material. To the right of the door is a large wire shelf that I installed to organize my glues and sprays and larger notions. To the right of that is a small bookshelf (which I hope to upgrade soon) filled to capacity with craft-related books and magazines. it is topped with my pretty darn impressive thread stash. To the right of that you have the sewing area. My favorite machine is set up and ready to go at all times in front of the white chair, while the machines I use less often kind of hang out by the wall and can be pulled forward to the brown chair work station when they are needed. Under the table I have storage shelves which gives me a lot of room to put things that I don't use that often. The table was "created" by setting up a standard folding table and making it "bigger" by topping it with pieces of melamine (which have the added bonus of making the table less "bouncy" when my machines really start rocking). To the right of that is the cutting station - which is simply an uninstalled kitchen sink base cabinet that I topped with a large piece of melamine and a self-healing mat. I got the base for free because it didn't have doors (oh well) and had a minor scratch (which I could care less about). The height is absolutely perfect for me. In the picture you can also see my super comfy chair, which I spend a lot of time in. It is not pretty enough to leave uncovered, but it is seriously the most comfy chair in the whole world.In this next shot you can see the padded surface of my work table. I can iron directly on the table, which is a huge time saver. It is just one of those "pop up tables" that you can get for under $50 if you keep your eyes open for sales at Jo-Ann's. I highly recommend them. Under that table and to the left and right you'll see a variety of storage shelves and bins. Oh, and see that light hanging above the sewing machine? I got it for $15 at Walmart and I have no idea how I lived without it! It is absolutely the way to go if you are in a room where you seem to always be casting a shadow with your head right where you really need the light to be. Speaking of lighting, overhead there is a ceiling fan (which is great) that has a light (which is less than great). Therefore, I was forced to resort to task lighting at each of my work stations. I'm pretty happy overall with the lighting, and during the day the lighting isn't an issue at all since the windows let in so much natural light.In this third picture you get to see what I call the technology station and the Tower of Terror (the precariously piled shelving solutions that were never meant to work together). Yes, you do see 2 laptops AND an extra monitor. I'm in the process of breaking in my new laptop and I still have to refer back to the old one (which has a burned out backlight and only works if you hook it up to a separate monitor) to find things I forgot to move over to the new computer. It is a painful process, and takes up WAY too much room on the desk.And finally we have a shot looking back where we started. The stairs exit down on the left. To the right of that you can see the very necessary TV/DVR/stereo area (when you spend as much time as I do in this room you need some noise to keep you company). And then to the right of that you see my packaging and photographing area (my super fab light box that I made for free over a year ago is still doing its job just fine!).So that is a tour of my studio. It is a mish-mash of random things that I've managed to pile up, repurpose, and arrange into a space that functions - even though it will never make the cover of "Glamorous Studios" magazine. My husband says that if I had a refrigerator up here I'd probably never come downstairs, but that isn't true - the dog needs to go for a walk every now and then and so far I haven't figured out a way to do that from the third floor.
Sunday, August 31, 2008
Spoonflower
Thanks to Steve (my pretty, pretty bridesmaid) I was introduced to the coolest idea/website I've seen since he sent me a link to Etsy a year and a half ago. It is called Spoonflower and it is probably best described using their own words, "Spoonflower gives individuals the power to print their own designs on fabric that they can then use to make quilts, clothes, pillows, blankets, framed textile art and many, many other things that might surprise you." I was immediately taken in because this is something that I've been attempting to do on my own for quite a while - with varying degrees of success. I've tried everything from those expensive printable sheets that you get at the craft stores (too expensive), to creating my own printable fabric sheets (too much ironing and prep work), to carving stamps and stamping fabric (inconsistent results), to sun printing ... oh, I could go on and on.
My idea journals dating as far back as 2 years ago contain pages and pages of fabric design ideas so this is something that has really been festering in my brain for some time. To say the very least, I was giddy at the thought of having my very own fabric line at my disposal and jumped in feet first without giving it a second thought.
My brain has been running non-stop and I can't get my ideas down fast enough. There is SO much potential here that I don't even know where to start!
... so I'm trying this again
My first attempt at blogging was - well - an attempt. I managed to sign in and and post once saying I'd be back later to get things fixed up. That was 13 months ago. I've already managed to do better than that with this blog so hopefully I'll get myself motivated a little more often.
If you see me getting slack feel free to smack me around a little and tell me to shape up!
If you see me getting slack feel free to smack me around a little and tell me to shape up!
Subscribe to:
Posts (Atom)
